Fedora 30 にマルチタッチジェスチャーの Fusuma をインストールする
Fusuma とは?
Linux 環境でのタッチパッドのスワイプやピンチ操作時に、コマンドを実行できるようにしてくれるツールです。
これにより、例えば Mac 環境のようにブラウザでピンチアウト・イン操作することで WEB ページを拡大・縮小するといったことができるようになります。
Fusuma は Ruby で開発されており、下記の Github リポジトリで公開されています。
Fedora 30 への Fusuma のインストール手順
Fedora 環境向けのインストール手順が確認できなかったので、備忘録として下記にまとめました。
まず、必要なパッケージをインストールします。
sudo dnf install libinput xdotool ruby rubygems
次に、Fusuma をインストールします。
sudo gem install fusuma
Fusuma のインストールが完了したら、インストール先のパスを確認します。
which fusuma
---
fusuma は /usr/local/bin/fusuma です
---
上記で確認したインストール先のパスを基に、ログイン時に自動的に Fusuma を起動させるためのデスクトップエントリファイルを作成します。
cat << EOF > .config/autostart/fusuma.desktop
[Desktop Entry]
Type=Application
Version=1.0
Name=Fusuma
Comment=Multitouch gestures with libinput driver on X11, Linux
Exec=/usr/local/bin/fusuma -d
Terminal=false
Categories=Utility;
EOF
デスクトップエントリファイルの詳細については、下記を確認して下さい。
下記の参考資料を元に必要に応じてジェスチャーをカスタマイズしたら、再ログインしてジェスチャーが機能するか確認します。
ログイン時に Fusuma が自動起動しない場合の調査方法
まず、/usr/local/bin/fusuma コマンドで Fusuma 起動してみてジェスチャーが機能するようであれば、デスクトップエントリファイルの作成過程に問題があった可能性が高いと思われます。
その場合には、下記のコマンドで作成したデスクトップエントリファイルが仕様に従っているか確認します。何らかの問題点がある場合には、エラーや警告が出力されます。
desktop-file-validate ~/.config/autostart/fusuma.desktop
なお、上記のコマンドでは Exec のコマンドの間違いなどはチェックできないようでしたのでご注意下さい。
参考資料
Ubuntu、Arch Linux へのインストール方法およびジェスチャーのカスタマイズ方法について下記の記事が参考になるかと思います。
ThinkPad X1 Carbon (Gen 5) の Fedora 29 を Fedora 30 ヘアップグレード
Fedora 30 は 2019-04-21 現在まだ Beta リリースですが、2019-05-07 の GA リリースまで我慢できず手元の Fedora 29 環境をアップグレードしてみました。
Releases/30/Schedule - Fedora Project Wiki
アップグレード手順と、アップグレード後に発生した問題をまとめておきます。
アップグレード手順
下記のドキュメントを参考に、インプレースでアップグレードしました。
DNF system upgrade - Fedora Project Wiki
アップグレード時のコマンドで指定する --releasever= と module_platform_id= は 30 としました。
$ sudo dnf upgrade --refresh
$ reboot

$ sudo dnf install dnf-plugin-system-upgrade

$ sudo rpm --import /etc/pki/rpm-gpg/RPM-GPG-KEY-fedora-30-primary
$ sudo dnf system-upgrade download --refresh --releasever=30 --setopt='module_platform_id=platform:f30'
$ sudo dnf system-upgrade reboot
アップグレード後に発生した問題
半角/全角キーが効かず日本語入力ができない
原因は ibus-mozc の設定ファイル /usr/share/ibus/component/mozc.xml が上書きされてしまったためです。
対応として、component > engine > layout を default から jp に書き換えて保存し、再ログインすることで改善しました。
$ cat /usr/share/ibus/component/mozc.xml <component> <version>0.0.0.0</version> <name>com.google.IBus.Mozc</name> <license>New BSD</license> <exec>/usr/libexec/ibus-engine-mozc --ibus</exec> <textdomain>ibus-mozc</textdomain> <author>Google Inc.</author> <homepage>https://github.com/google/mozc</homepage> <description>Mozc Component</description> <engines> <engine> <description>Mozc (Japanese Input Method)</description> <language>ja</language> <symbol>あ</symbol> <rank>80</rank> <icon_prop_key>InputMode</icon_prop_key> <icon>/usr/share/ibus-mozc/product_icon.png</icon> <setup>/usr/libexec/mozc/mozc_tool --mode=config_dialog</setup> <layout>jp</layout> <name>mozc-jp</name> <longname>Mozc</longname> </engine> </engines> </component>
Gnomeの設定画面でトラックパッドの設定ができない、またトラックパッドの機能が貧弱
設定 > デバイス > マウスとタッチパッドでタッチパッドの設定画面が表示されず、トラックパッドの設定変更ができません。 また、トラックパッドの機能も貧弱で、2 本指スクロールなどもできません。
下記の記事で GRUB の設定で psmouse.proto=imps が含まれると原始的なタッチパッドとして動作してしまう報告がありました。
自分の環境の事象と類似と思われたので、下記のように設定を変更し、 grub2-mkconfig -o /boot/efi/EFI/fedora/grub.cfg で GRUB 設定ファイルを更新後に再起動したところ事象が改善しました。
$ diff /etc/default/grub.20190420 /etc/default/grub
6c6
< GRUB_CMDLINE_LINUX="rd.lvm.lv=fedora/root rd.lvm.lv=fedora/swap rhgb quiet i8042.reset i8042.nomux psmouse.proto=imps"
---
> GRUB_CMDLINE_LINUX="rd.lvm.lv=fedora/root rd.lvm.lv=fedora/swap rhgb quiet i8042.reset i8042.nomux psmouse.synaptics_intertouch=1"
Ansible で dnf モジュールのタスクがエラーになる
自分の環境では Ansible をインストールして localhost に対して playbook を実行することで環境構築を自動化していますが、Fedora 30 にアップグレード後に Ansible を実行したところ dnf モジュールを使用したタスクでエラーが発生するようになりました。
下記が発生したエラーです。
fatal: [localhost]: FAILED! => {"changed": false, "msg": "`python2-dnf` is not installed, but it is requiredfor the Ansible dnf module.", "results": []}
下記が Ansible のバージョ です。
$ ansible-playbook --version
ansible-playbook 2.7.10
  config file = /etc/ansible/ansible.cfg
  configured module search path = ['/home/*****/.ansible/plugins/modules', '/usr/share/ansible/plugins/modules']
  ansible python module location = /usr/lib/python3.7/site-packages/ansible
  executable location = /usr/bin/ansible-playbook
  python version = 3.7.3 (default, Mar 27 2019, 13:36:35) [GCC 9.0.1 20190227 (Red Hat 9.0.1-0.8)]
python2-dnf がインストールされていないというエラーでしたので、Fedora 30 での該当パッケージの有無・インストール状況を確認してみましたが、存在するパッケージは python3-dnf のみであり、また既にインストール済みでした。
$ $ dnf list python*-dnf
...
インストール済みパッケージ
python3-dnf.noarch              4.2.2-2.fc30                  @fedora
原因ですが、下記の issue に記載されているように、Ansible がターゲットで処理を実行する際にデフォルトで Python2 を使用する動作であることから python2-dnf パッケージを必要としていたようです。
対応として、ターゲットで Ansible が Python3 で実行されるよう、インベントリファイルなどで ansible_python_interpreter=/usr/bin/python3 を対象ホスト(今回の場合は localhost)に設定することで解決しました。
ThinkPad X1 Carbon(2017モデル)のFedora27をFedora28にアップグレード
ThinkPad X1 Carbon(2017モデル)にインストールしていたFedora27をFedora28にアップグレードしました。
Fedora27は下記の手順でアップグレードインストールしていました。
今回も上記と同様の手順でいきます。
環境
手順
バックアップを取得
ホームディレクトリ配下をrsyncでリモートや外部メディアなどにバックアップしておきます。
ただし、バックアップ時間の短縮のために、ファイル数の多かった隠しディレクトリと比較的巨大なファイルが格納されていたディレクトリをバックアップ対象から除外しています。
$ rsync -av --exclude='.*' --exclude='Downloads' --exclude='VirtualBox*' ~/ <path/to/backup/destination>
Fedora28をLiveイメージから起動して動作確認
アップグレード手順を進める前に、ハードウェアとの相性を確認するためにLiveイメージで起動を試みます。
下記手順でLiveイメージをDVDに書き込みます。
$ sudo dnf install wodim
$ wodim --devices
wodim: Overview of accessible drives (1 found) :
-------------------------------------------------------------------------
 0  dev='/dev/sr0'  rwrw-- : 'HL-DT-ST' 'DVD-RAM GSA-H55N'
-------------------------------------------------------------------------

$ wodim -v dev=/dev/sr0 -eject ~/Downloads/Fedora-Workstation-Live-x86_64-28-1.1.iso
上記で作成したDVDで起動し、下記の観点で動作確認します。
今回も特に問題はありませんでしたので、アップグレード作業を進めます。
Fedora28へのアップグレード
まず、現在のバージョンでアップデート可能なパッケージを適用します。
$ sudo dnf upgrade --refresh
$ sudo reboot
次に、dnf-plugin-system-upgradeパッケージをインストールします。 今回はFedora26からFedora27へのアップグレード時に、同様のパッケージをインストールしていたため変更はありませんでした。
$ sudo dnf install dnf-plugin-system-upgrade
次に、Fedora28アップグレード用のパッケージをダウンロードします。今回は下記のようなエラーが発生しました。
$ sudo dnf system-upgrade download --refresh --releasever=28
~~~
エラー:
 Problem: nss-pem-1.0.3-6.fc27.i686 has inferior architecture
  - nss-pem-1.0.3-6.fc27.x86_64 does not belong to a distupgrade repository
  - problem with installed package nss-pem-1.0.3-6.fc27.i686
エラーメッセージでぐぐると、該当する不具合報告が上がっていました。
- Bug 1566070 – Obsoletes takes effect on install but not on update with dnf (yum-deprecated works)
- Bug 1553646 – Upgrading F27 > F28 is not possible because of nss-pem
nss-pem-1.0.3-6.fc27.i686はwineなどの依存でインストールされるようです。
ワークアラウンドは既に存在しており、下記コマンドでnss-pemパッケージをバージョンアップすれば良いようです。その後、 Fedora28アップグレード用のパッケージをダウンロードします。
$ sudo dnf install nss-pem-1.0.3-9.fc28 --releasever=28
$ sudo dnf system-upgrade download --refresh --releasever=28
最後に、下記コマンドでアップグレードを開始します。直ちにOSが再起動されてアップグレードが開始されます。
$ sudo dnf system-upgrade reboot
Fedora27からFedora28にアップグレードして気づいた点
ibus-mozcで日本語入力ができなくなった
Fedora26からFedora27にアップグレードした際にも発生していました。
対象方法は簡単で、下記の通り/usr/share/ibus/component/mozc.xmlを修正してログインし直すことで解消しました。
@@ -16,7 +16,7 @@
   <icon_prop_key>InputMode</icon_prop_key>
   <icon>/usr/share/ibus-mozc/product_icon.png</icon>
   <setup>/usr/libexec/mozc/mozc_tool --mode=config_dialog</setup>
-  <layout>default</layout>
+  <layout>jp</layout>
   <name>mozc-jp</name>
   <longname>Mozc</longname>
 </engine>
まとめ
PrometheusとPushgatewayでGoogle Finance APIの株価をPushしてモニタリングしてみた
コンテナ環境などスケールするインフラ、システムのモニタリングに向いていると話題のPrometheusですが、Zabbix SenderみたいなPush型方式のモニタリングができるのか興味があったので調べてみました。
結論から述べると、下記の要領でPush型のモニタリングができるようです。
- Pushgatewayを起動する
- Pushgateway宛にメトリクスをPushする
- PushgatewayがPushされたメトリクスをエクスポートする
- PrometheusからPushgateway上のメトリクスをスクレイプする
Prometheusを扱うことも初めてでしたが、やってみたことをまとめてみます。
環境
1台のサーバにすべてのミドルウェアをインストールしていきます。
- OS: CentOS 7.4
- Prometheus: 2.2.1
- node_exporter: 0.15.2
- Pushgateway: 0.4.0
- Grafana: 5.0.4
なお、下記のポートで各サービスが提供されるようになります。
| port | service |
|---|---|
| tcp/3000 | Grafana |
| tcp/9090 | Prometheus Server |
| tcp/9091 | Prometheus Pushgateway |
| tcp/9100 | Prometheus Node Exporter |
参考
構築手順に関しては、下記を参考にしました。
- Getting started | Prometheus
- prometheusでテストアラート by pushgateway - Qiita
- インフラ・サービス監視ツールの新顔「Prometheus」入門 | さくらのナレッジ
PythonでPushgatewayにデータを送るスクリプトを作成するために下記を参考にしました。
モニタリング対象データとして、Google Finance APIで株価をリアルタイムで取得するために下記を参考にしました。
- Google financeでティックデータを取得するときのメモ – Momentum
- google financeのAPIのメモ - メモ
- Real-Time Google Finance API を使って株価を取得する
構築手順
Python 3.6のインストール
PythonでPushgatewayにメトリクスを送るスクリプトを記述するため、下記手順でPythonをインストールしておきます。
# yum install epel-release
# yum install python36
# python36 --version
Python 3.6.3
Prometheus各種サービス起動用のユーザ作成
Prometheus関連サービスの起動用のユーザを作成しておきます。
# useradd -U -s /sbin/nologin -M -d / prometheus
Node Exporterのインストール
Node Exporterのバイナリをダウンロードし、/usr/localに配置します。
# cd /tmp
# wget https://github.com/prometheus/node_exporter/releases/download/v0.15.2/node_exporter-0.15.2.linux-amd64.tar.gz
# tar zxvf node_exporter-0.15.2.linux-amd64.tar.gz
# mv node_exporter-0.15.2.linux-amd64 /usr/local
# ln -s -f /usr/local/node_exporter-0.15.2.linux-amd64 /usr/local/node_exporter
Node ExporterのSystemd用のUnitファイルを作成します。
# vi /etc/systemd/system/node_exporter.service
---
[Unit]
Description=node_exporter for Prometheus

[Service]
Restart=always
User=prometheus
ExecStart=/usr/local/node_exporter/node_exporter
ExecReload=/bin/kill -HUP $MAINPID
TimeoutStopSec=20s
SendSIGKILL=no

[Install]
WantedBy=multi-user.target
---
Node Exporterの自動起動設定を有効化し、起動します。
# systemctl daemon-reload
# systemctl enable node_exporter
# systemctl start node_exporter
Node Exporterのサービス用のURLにアクセスいて、取得しているメトリクス一覧を確認しましょう。
Pushgatewayのインストール
Pushgatewayのバイナリをダウンロードし、/usr/localに配置します。
# cd /tmp
# wget https://github.com/prometheus/pushgateway/releases/download/v0.4.0/pushgateway-0.4.0.linux-amd64.tar.gz
# tar zxvf pushgateway-0.4.0.linux-amd64.tar.gz
# mv pushgateway-0.4.0.linux-amd64 /usr/local
# ln -s -f /usr/local/pushgateway-0.4.0.linux-amd64 /usr/local/pushgateway
PushgatewayのSystemd用のUnitファイルを作成します。
# vi /etc/systemd/system/pushgateway.service
---
[Unit]
Description=pushgateway for Prometheus

[Service]
Restart=always
User=prometheus
ExecStart=/usr/local/pushgateway/pushgateway
ExecReload=/bin/kill -HUP $MAINPID
TimeoutStopSec=20s
SendSIGKILL=no

[Install]
WantedBy=multi-user.target
---
Pushgatewayの自動起動設定を有効化し、起動します。
# systemctl daemon-reload
# systemctl enable pushgateway
# systemctl start pushgateway
Pushgatewayのサービス用のURLにアクセスし、Pushgateway上のメトリクスを確認してみましょう。後々Pushしたメトリクスが表示されるようになります。
Prometheusのインストール
まず、設定ファイルとモニタリングデータを配置するためのディレクトリを作成しておきます。
# mkdir /etc/prometheus /var/lib/prometheus
# chown prometheus:prometheus /var/lib/prometheus
Prometheusのバイナリをダウンロードし、/usr/localに配置します。
# cd /tmp
# wget https://github.com/prometheus/prometheus/releases/download/v2.2.1/prometheus-2.2.1.linux-amd64.tar.gz
# tar zxvf prometheus-2.2.1.linux-amd64.tar.gz
# mv prometheus-2.2.1.linux-amd64 /usr/local
# ln -s -f /usr/local/prometheus-2.2.1.linux-amd64 /usr/local/prometheus
設定ファイルを作成します。
# cp -piv /usr/local/prometheus/prometheus.yml /etc/prometheus/
# vi /etc/prometheus/prometheus.yml
---
global:
  scrape_interval:     15s # By default, scrape targets every 15 seconds.

  # Attach these labels to any time series or alerts when communicating with
  # external systems (federation, remote storage, Alertmanager).
  external_labels:
    monitor: 'codelab-monitor'

# A scrape configuration containing exactly one endpoint to scrape:
# Here it's Prometheus itself.
scrape_configs:
  # The job name is added as a label `job=<job_name>` to any timeseries scraped from this config.
  - job_name: 'prometheus'

    # Override the global default and scrape targets from this job every 5 seconds.
    scrape_interval: 5s

    static_configs:
      - targets: ['localhost:9090']

  # for Node Exporter in Prometheus Server
  - job_name: 'node'
    static_configs:
      - targets: ['localhost:9100']

  # for Pushgateway
  - job_name: 'pushgateway'
    static_configs:
      - targets: ['localhost:9091']
---
PrometheusのSystemd用のUnitファイルを作成します。
# vi /etc/systemd/system/prometheus.service
---
[Unit]
Description=Prometheus - Monitoring system and time series database

[Service]
Restart=always
User=prometheus
ExecStart=/usr/local/prometheus/prometheus --config.file=/etc/prometheus/prometheus.yml --storage.tsdb.path=/var/lib/prometheus/data
ExecReload=/bin/kill -HUP $MAINPID
TimeoutStopSec=20s
SendSIGKILL=no

[Install]
WantedBy=multi-user.target
---
Prometheusの自動起動設定を有効化し、起動します。
# systemctl daemon-reload
# systemctl enable prometheus
# systemctl start prometheus
PCなどからPrometheusのGraph描画用のページにアクセスし、取得しているメトリクスのグラフが描画できることを確認します。
- http://{{ PrometheusをインストールしたサーバのIP }}:9090/graph

Grafanaのインストール
下記を参考にインストールします。
http://docs.grafana.org/installation/rpm/
# sudo yum install https://s3-us-west-2.amazonaws.com/grafana-releases/release/grafana-5.0.4-1.x86_64.rpm
# systemctl daemon-reload
# systemctl start grafana-server
# systemctl status grafana-server
その後、WEB画面から以下の設定を設定します。
- Prometheusをデータソースとして追加する
- PrometheusのNode Exporter用のダッシュボードをインストールする
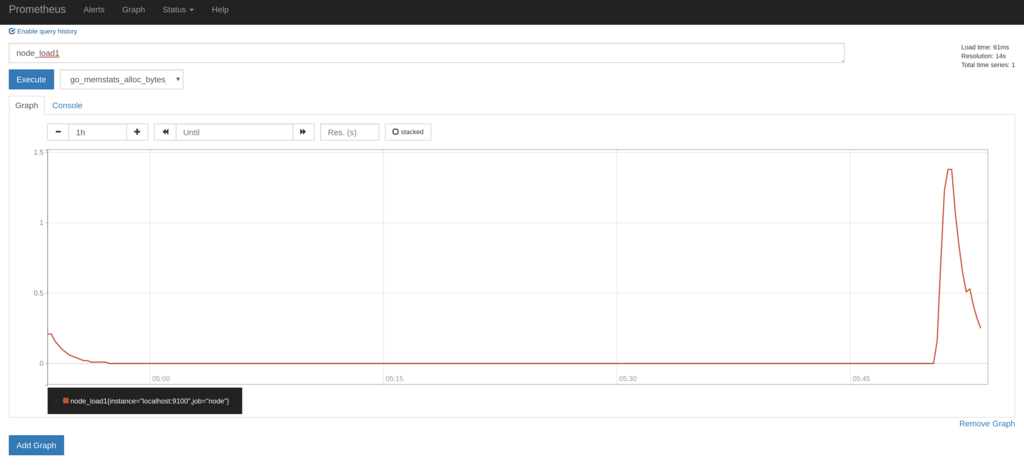
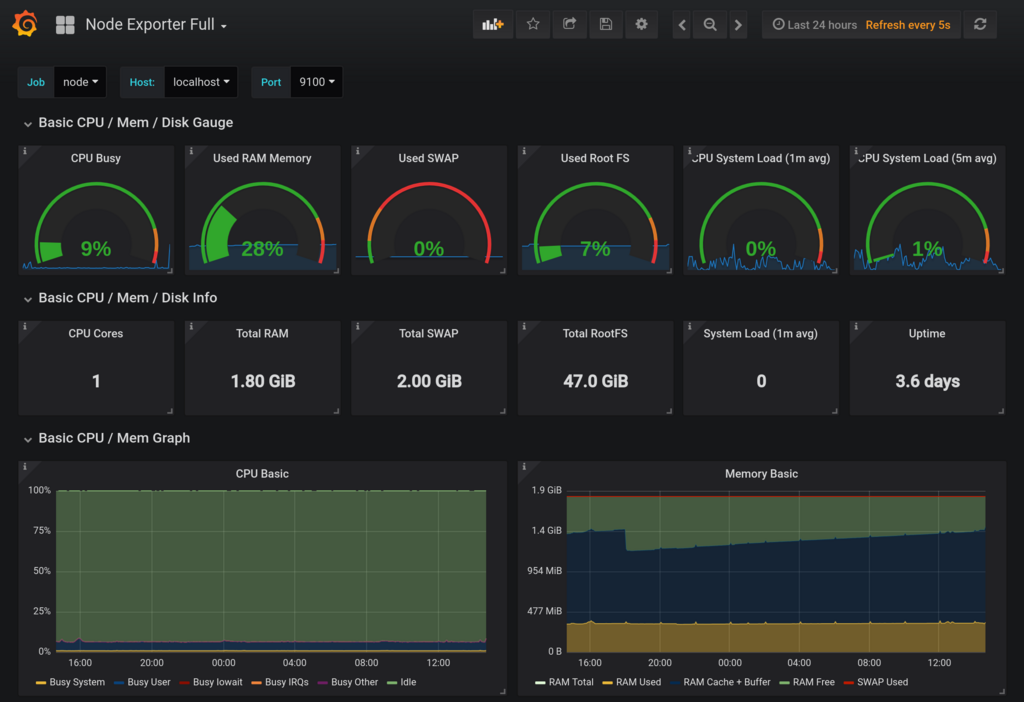
上記のダッシュボードをインストールするだけで、OS関係のメトリクスの関しては十分なほど視覚化されます。

Pushgateway経由でのモニタリング
Google Finance APIから株価データを取得してPushgatewayにPushしてみる
Google Finance APIを利用して、1分毎のリアルタイムな株価データを取得し、Pushgateway経由でPrometheusに連携してみたいと思います。 APIが非公式であり、使い方に癖があるため実装が間違っている箇所があるかもしませんので正確性についてはご了承下さい。
下記のようなスクリプトをstock.pyというファイル名で作成します。
from prometheus_client import CollectorRegistry, Gauge, push_to_gateway, generate_latest
import requests
import json
import re
import argparse
import traceback
import time

# Google Finance API用
API_URL = 'https://www.google.com/finance/getprices?q={code}&x={market}&i=61&p=1Df=d,c,v,o,h,l'
regex = re.compile('a(?P<date>\d+),(?P<close>[^,]+),(?P<high>[^,]+),(?P<low>[^,]+),(?P<open>[^,]+),(?P<volume>\d+)')
def google_finance_api_parser(response):
    lines = response.splitlines()
    m = regex.finditer(lines[-1])
    return next(m)

# Main
def main():
    argparser = argparse.ArgumentParser()
    argparser.add_argument('-g', '--gateway', type=str, required=True)
    argparser.add_argument('-m', '--market', type=str, required=True)
    argparser.add_argument('-c', '--code', type=str, required=True)
    argparser.add_argument('--debug', action='store_true', help='debug printing without pushing to gateway')

    args = argparser.parse_args()
    request_url = API_URL.format(market=args.market, code=args.code)
    r = requests.get(request_url)
    if r.status_code == 200:
        registry = CollectorRegistry()
        try:
            d = google_finance_api_parser(r.text)
            Gauge('stock_price_close', 'Stock price', ['market', 'code'], registry=registry).labels(market=args.market, code=args.code).set(d['close'])
            Gauge('stock_price_high', 'Stock price', ['market', 'code'], registry=registry).labels(market=args.market, code=args.code).set(d['high'])
            Gauge('stock_price_low', 'Stock price', ['market', 'code'], registry=registry).labels(market=args.market, code=args.code).set(d['low'])
            Gauge('stock_price_open', 'Stock price', ['market', 'code'], registry=registry).labels(market=args.market, code=args.code).set(d['open'])
            Gauge('stock_price_volume', 'Stock price', ['market', 'code'], registry=registry).labels(market=args.market, code=args.code).set(d['volume'])
            Gauge('stock_price_unixtime', 'Stock price', ['market', 'code'], registry=registry).labels(market=args.market, code=args.code).set(d['date'])
            Gauge('stock_price_last_success_unixtime', 'Stock price', ['market', 'code'], registry=registry).labels(market=args.market, code=args.code).set(int(time.time()))

            if args.debug:
                print(request_url)
                print(generate_latest(registry=registry).decode('utf-8'))
            else:
                grouping_key = {'market': args.market, 'code': args.code}
                push_to_gateway(gateway=args.gateway, job='STOCK', registry=registry, grouping_key=grouping_key)
        except:
            print('[Error] failed to send stock data. check api response from "{}"'.format(request_url))
            traceback.print_exc()

if __name__ == '__main__':
    main()
上記のスクリプトで生成されるメトリクスは下記の通りです。市場と証券コードはラベルで区別するようにしました。
| メトリクス名 | 内容 |
|---|---|
| stock_price_close | 終値 |
| stock_price_high | 高値 |
| stock_price_low | 安値 |
| stock_price_open | 始値 |
| stock_price_volume | 出来高 |
| stock_price_unixtime | 終値の時刻(Unixtime) |
| stock_price_last_success_unixtime | 株価を取得した時刻(Unixtime) |
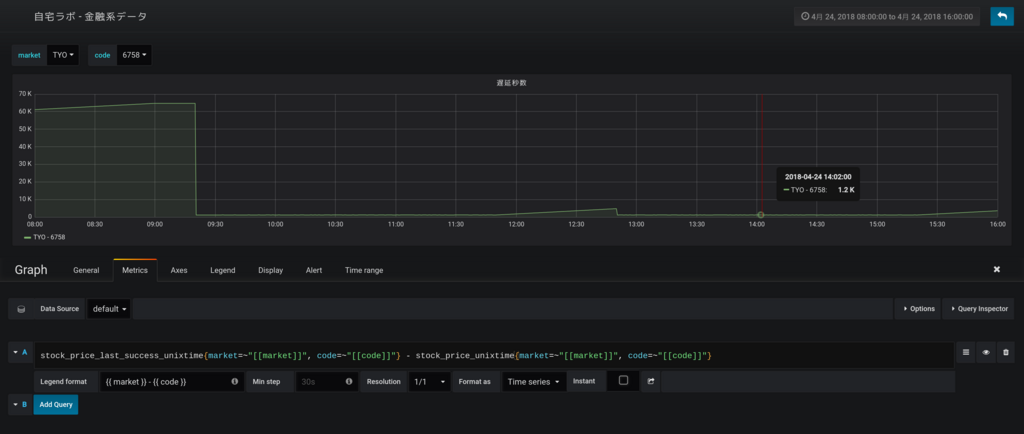
Google Finance APIでは国内の株価は20分ほど遅延しており、株価を取得した時刻(stock_price_last_success_unixtime)と取得できた終値の時刻(stock_price_unixtime)には差が生じます。このあたりも、後にグラフ化するとよくわかるようになります。
次に、下記のように実行環境を作成します。
$ mkdir ~/bin
$ cd ~/bin
$ vi stock.py
※ 上記で作成したスクリプトを保存します

$ python36 -m venv env
$ source env/bin/activate
(env) $ pip install prometheus_client requests
スクリプトにPushgatewayのURLとGoogle Finance APIから取得する株価の市場とコードを引数として与え実行します。
試しに標準出力にデータを出力してみます。
(env) $ python stock.py -g localhost:9091 -m TYO -c 6758 --debug
----
# HELP stock_price_close Stock price
# TYPE stock_price_close gauge
stock_price_close{code="6758",market="TYO"} 5426.0
# HELP stock_price_high Stock price
# TYPE stock_price_high gauge
stock_price_high{code="6758",market="TYO"} 5427.0
# HELP stock_price_low Stock price
# TYPE stock_price_low gauge
stock_price_low{code="6758",market="TYO"} 5425.0
# HELP stock_price_open Stock price
# TYPE stock_price_open gauge
stock_price_open{code="6758",market="TYO"} 5425.0
# HELP stock_price_volume Stock price
# TYPE stock_price_volume gauge
stock_price_volume{code="6758",market="TYO"} 67800.0
# HELP stock_price_unixtime Stock price
# TYPE stock_price_unixtime gauge
stock_price_unixtime{code="6758",market="TYO"} 1524548340.0
# HELP stock_price_last_success_unixtime Stock price
# TYPE stock_price_last_success_unixtime gauge
stock_price_last_success_unixtime{code="6758",market="TYO"} 1524549541.0
----

Pushgatewayにデータを送ります。
(env) $ python stock.py -g localhost:9091 -m TYO -c 6758 --debug
cronで毎分実行させるために、crontabに設定を追加します。
$ crontab -e
---
* * * * * cd ${HOME}/bin && source env/bin/activate && python stock.py -g localhost:9091 -m TYO -c 6758 > /dev/null 2>&1
* * * * * cd ${HOME}/bin && source env/bin/activate && python stock.py -g localhost:9091 -m TYO -c 9432 > /dev/null 2>&1
---
PushしたメトリクスをPushgatewayで確認する
Pushgatewayのメトリクス一覧を確認すると、下記のようにPushしたメトリクスがエクスポートされるようになります。
# HELP stock_price_close Stock price
# TYPE stock_price_close gauge
stock_price_close{code="6758",instance="",job="STOCK",market="TYO"} 5433
stock_price_close{code="9432",instance="",job="STOCK",market="TYO"} 5163
# HELP stock_price_high Stock price
# TYPE stock_price_high gauge
stock_price_high{code="6758",instance="",job="STOCK",market="TYO"} 5434
stock_price_high{code="9432",instance="",job="STOCK",market="TYO"} 5164
# HELP stock_price_last_success_unixtime Stock price
# TYPE stock_price_last_success_unixtime gauge
stock_price_last_success_unixtime{code="6758",instance="",job="STOCK",market="TYO"} 1.524550204e+09
stock_price_last_success_unixtime{code="9432",instance="",job="STOCK",market="TYO"} 1.524550205e+09
# HELP stock_price_low Stock price
# TYPE stock_price_low gauge
stock_price_low{code="6758",instance="",job="STOCK",market="TYO"} 5433
stock_price_low{code="9432",instance="",job="STOCK",market="TYO"} 5162
# HELP stock_price_open Stock price
# TYPE stock_price_open gauge
stock_price_open{code="6758",instance="",job="STOCK",market="TYO"} 5434
stock_price_open{code="9432",instance="",job="STOCK",market="TYO"} 5163
# HELP stock_price_unixtime Stock price
# TYPE stock_price_unixtime gauge
stock_price_unixtime{code="6758",instance="",job="STOCK",market="TYO"} 1.524549e+09
stock_price_unixtime{code="9432",instance="",job="STOCK",market="TYO"} 1.524549e+09
# HELP stock_price_volume Stock price
# TYPE stock_price_volume gauge
stock_price_volume{code="6758",instance="",job="STOCK",market="TYO"} 21800
stock_price_volume{code="9432",instance="",job="STOCK",market="TYO"} 3900
今回のように、同一メトリクスに対してラベルを切り替えて複数回に分けてデータをPushする場合は、grouping_keyを適切に設定しないとすでにPush済みのデータが削除されてしまうこともあるので注意が必要です。
私の場合は、当初grouping_keyを全く設定していなかったため、cronで設定したうちの一つの株価しかPushgatewayに残りませんでした。
詳細は下記を参照して下さい。
PushしたメトリクスをGrafanaで確認する
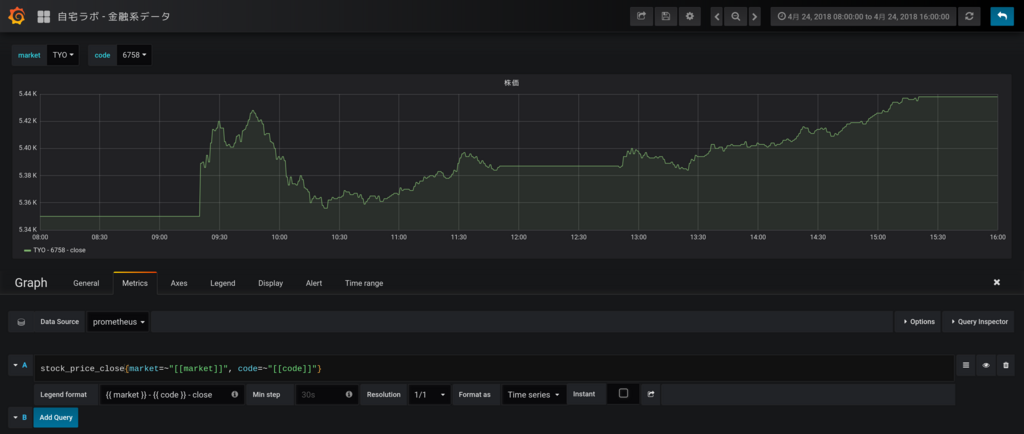
下記のように株価のグラフを作成します。ローソクではなく1分毎の終値でプロットさせていますが、なんとなく株価のように見えますね。

次に、APIの更新遅延のグラフを作成します。取引時間中はだいたい1200秒(20分)程度遅延しているようですね。お昼休みと取引時間外はAPIの最新データの時刻が更新されないため遅延が拡大していっています。

まとめ
PrometheusとPushgatewayでPush型のモニタリングができるかをGoogle Finance APIのデータを使って試してみました。
Google Finance APIの調査に時間をかけてしまいましたが、Prometheus自体は簡単に構築できてNode Exporterだけでも十分すぎるほどメトリクスが取得でき、またGrafanaでも簡単に視覚化できるので非常に便利だなと思いました。
Zabbix Senderと比較して思ったのが、PrometheusではPushgatewayをスクレイプした時刻でメトリクスを記録するため、過去の事項に遡ってデータを登録するといったことは難しそうということです。ちなみに、Zabbix Senderではタイムスタンプ付きでデータを送れるためバルクインサート的なことが可能になっています。
PrometheusでもバルクインサートAPIを求めるissueが上がっているようです。
Add API for bulk imports · Issue #535 · prometheus/prometheus · GitHub
今度は、アラート通知などもやってみたいと思います。
自己証明書を簡単に作成する方法
環境
- OS: CentOS 7.4
OpenSSLのパッケージが用意した?スクリプト
RPMなどのパッケージでopensslを導入した環境では、下記のスクリプトが配置されている。
$ ls -al /etc/pki/tls/certs/make-dummy-cert
-rwxr-xr-x. 1 root root 610  8月  4  2017 /etc/pki/tls/certs/make-dummy-cert

$ rpm -qf /etc/pki/tls/certs/make-dummy-cert
openssl-1.0.2k-8.el7.x86_64

$ cat /etc/pki/tls/certs/make-dummy-cert
#!/bin/sh
umask 077

answers() {
        echo --
        echo SomeState
        echo SomeCity
        echo SomeOrganization
        echo SomeOrganizationalUnit
        echo localhost.localdomain
        echo root@localhost.localdomain
}

if [ $# -eq 0 ] ; then
        echo $"Usage: `basename $0` filename [...]"
        exit 0
fi

for target in $@ ; do
        PEM1=`/bin/mktemp /tmp/openssl.XXXXXX`
        PEM2=`/bin/mktemp /tmp/openssl.XXXXXX`
        trap "rm -f $PEM1 $PEM2" SIGINT
        answers | /usr/bin/openssl req -newkey rsa:2048 -keyout $PEM1 -nodes -x509 -days 365 -out $PEM2 2> /dev/null
        cat $PEM1 >  ${target}
        echo ""   >> ${target}
        cat $PEM2 >> ${target}
        rm -f $PEM1 $PEM2
done
このスクリプトを使うことで、下記のように秘密鍵と証明書がセットになったファイルを簡単に作成できる。
-----BEGIN PRIVATE KEY-----
省略
-----END PRIVATE KEY-----

-----BEGIN CERTIFICATE-----
省略
-----END CERTIFICATE-----
使い方
下記のように、作成するファイル名を引数で与えれば一度に複数のファイルが作成できる。
$ /etc/pki/tls/certs/make-dummy-cert /tmp/test_cert_{1,2,3,4,5,6,7,8,9}.crt

$ ls -al /tmp/test_cert_*
-rw-------. 1 aoishi aoishi 3254  4月  5 15:57 /tmp/test_cert_1.crt
-rw-------. 1 aoishi aoishi 3254  4月  5 15:57 /tmp/test_cert_2.crt
-rw-------. 1 aoishi aoishi 3254  4月  5 15:57 /tmp/test_cert_3.crt
-rw-------. 1 aoishi aoishi 3254  4月  5 15:57 /tmp/test_cert_4.crt
-rw-------. 1 aoishi aoishi 3254  4月  5 15:57 /tmp/test_cert_5.crt
-rw-------. 1 aoishi aoishi 3254  4月  5 15:57 /tmp/test_cert_6.crt
-rw-------. 1 aoishi aoishi 3254  4月  5 15:57 /tmp/test_cert_7.crt
-rw-------. 1 aoishi aoishi 3258  4月  5 15:57 /tmp/test_cert_8.crt
-rw-------. 1 aoishi aoishi 3254  4月  5 15:57 /tmp/test_cert_9.crt
秘密鍵と証明書は下記の要領で分離する。
x) 秘密鍵
$ sed -n -e "/-----BEGIN PRIVATE KEY-----/,/-----END PRIVATE KEY-----/p" /tmp/test_cert_1.crt

x) 証明書
$ sed -n -e "/-----BEGIN CERTIFICATE-----/,/-----END CERTIFICATE-----/p" /tmp/test_cert_1.crt
ThinkPad X1 Carbon 2017のFedora27にVirtualBoxをインストールしようとしてハマった
昨年に下記の記事でThinkPad X1 Carbon(2017)のFedora26をFedora27にアップグレードしたことを紹介した。
その環境にVirtualBoxをインストールしたところ、仮想マシンが起動できない事象が発生し見事にハマってしまったが、原因はセキュアブートを有効化していたことにあったようで、これを無効化することで事象解決した。
せっかくなのでまとめておく。
環境
- PC: ThinkPad X1 Carbon 2017
- OS: Fedora release 27 (Twenty Seven)
- Kernel: 4.15.9-300.fc27.x86_64
- VirtualBox: VirtualBox-5.2-5.2.8_121009_fedora26-1.x86_64
発生した事象
CLIでVirtualBoxを起動した際に、GUIは起動されるものの下記のメッセージが表示される。
$ virtualbox
WARNING: The vboxdrv kernel module is not loaded. Either there is no module
         available for the current kernel (4.15.9-300.fc27.x86_64) or it failed to
         load. Please recompile the kernel module and install it by

           sudo /sbin/vboxconfig

         You will not be able to start VMs until this problem is fixed.
また、起動したGUIから仮想マシン(OS未インストールの状態)を起動しようとすると、「仮想マシン *** のセッションを開けませんでした。」のメッセージとともに、下記がポップアップされ仮想マシンが起動できない。

VirtualBoxのインストールの参考とした手順
下記などを参考にした。
- VirtualBox 5.2 on Fedora 27/26, CentOS/RHEL 7.4/6.9 – If Not True Then False
- Install VirtualBox 5.2 on Fedora 27 / Fedora 26/25 - ITzGeek
トラブルシュート
kernel関係のパッケージ不足
色々やってみた感じだと、とりあえずVirtualBoxのパッケージのインストール自体は成功するようだった。 ただし、dnfでインストールした際にエラーメッセージが出力されるので注意が必要だった。
例えば、私がいきなりVirtualBoxのパッケージをインストールした際は下記のような感じになった。
vboxdrv.sh: failed: Look at /var/log/vbox-install.log to find out what went wrong.
This system is not currently set up to build kernel modules (system extensions).
Running the following commands should set the system up correctly:

  yum install kernel-core-devel-4.15.9-300.fc27.x86_64
(The last command may fail if your system is not fully updated.)
  yum install kernel-core-devel

There were problems setting up VirtualBox.  To re-start the set-up process, run
  /sbin/vboxconfig
as root.
上記の原因は手順通りにkernel周りのパッケージをインストールしていないためであった。 kernel関係のパッケージのバージョンを揃えることに注意しながら必要なパッケージをインストールし、最終的に下記のようになった。
$ dnf list installed kernel*$(uname -r)
インストール済みパッケージ
kernel.x86_64                       4.15.9-300.fc27          @updates
kernel-core.x86_64                  4.15.9-300.fc27          @updates
kernel-devel.x86_64                 4.15.9-300.fc27          @updates
kernel-headers.x86_64               4.15.9-300.fc27          @updates
kernel-modules.x86_64               4.15.9-300.fc27          @updates
kernel-modules-extra.x86_64         4.15.9-300.fc27          @updates
kernel関係以外のパッケージ不足
上記実施後に、/sbin/vboxconfigコマンドを実行してみたところ、引き続きエラーメッセージが出力された。
$ sudo /sbin/vboxconfig
vboxdrv.sh: Stopping VirtualBox services.
vboxdrv.sh: Building VirtualBox kernel modules.
vboxdrv.sh: failed: Look at /var/log/vbox-install.log to find out what went wrong.

There were problems setting up VirtualBox.  To re-start the set-up process, run
  /sbin/vboxconfig
as root.
ログ(/var/log/vbox-install.log)を確認したところ、下記のメッセージが出力されていた。
make KBUILD_VERBOSE=1 SUBDIRS=/tmp/vbox.0 SRCROOT=/tmp/vbox.0 CONFIG_MODULE_SIG= -C /lib/modules/4.15.9-300.fc27.x86_64/build -j4 modules
make[1]: 警告: 副次 make で -jN を強制指定しました: jobserver モードを無効にします.
Makefile:937: *** "Cannot generate ORC metadata for CONFIG_UNWINDER_ORC=y, please install libelf-dev, libelf-devel or elfutils-libelf-devel".  中止.
make: *** [Makefile:305: vboxdrv] エラー 2
libelf-dev, libelf-devel, elfutils-libelf-develのいずれかのパッケージが足りていないようだった。 Fedoraに存在していたelfutils-libelf-develをインストールした。
$ sudo dnf install elfutils-libelf-devel
セキュアブートの無効化
上記実施するも、/sbin/vboxconfigコマンドを実行すると引き続きエラーメッセージが表示された。
ログ(/var/log/vbox-install.log)には下記のようなメッセージが出力されていた。
make KBUILD_VERBOSE=1 SUBDIRS=/tmp/vbox.0 SRCROOT=/tmp/vbox.0 CONFIG_MODULE_SIG= -C /lib/modules/4.15.9-300.fc27.x86_64/build -j4 modules
make[1]: 警告: 副次 make で -jN を強制指定しました: jobserver モードを無効にします.
test -e include/generated/autoconf.h -a -e include/config/auto.conf || (        \
echo >&2;                            \
echo >&2 "  ERROR: Kernel configuration is invalid.";        \
echo >&2 "         include/generated/autoconf.h or include/config/auto.conf are missing.";\
echo >&2 "         Run 'make oldconfig && make prepare' on kernel src to fix it.";    \
echo >&2 ;                            \
/bin/false)
下記の記事を見つけて、上記のエラーメッセージ通りコマンド実行してみるも事象は改善しなかった。
$ sudo sh -c "cd /usr/src/kernels/$(uname -r) && make oldconfig && make prepare"
また、一度OS再起動してみたが事象は改善しなかった。
その後、下記の記事より、BIOS(UEFI)でセキュアブートが有効になっているとコケることがあるとの情報を入手した。
早速、下記手順でBIOS画面でセキュアブートを無効化した。
1. ThinkPadを再起動 > 立ち上がり画面でEnterキーを押下 > さらにF1を押下
2. ThinkPad Setup画面が表示されることを確認
3. Security > Secure Boot > Security BootをEnabledからDisabledに変更
4. F10キーを押下し、設定を保存して再起動する
その後、/sbin/vboxconfigを実行したところエラーメッセージが解消した。
$ sudo /sbin/vboxconfig
vboxdrv.sh: Stopping VirtualBox services.
vboxdrv.sh: Building VirtualBox kernel modules.
vboxdrv.sh: Starting VirtualBox services.
この状態でVirtualBoxを起動し、無事仮想マシン(OS未インストールの状態)が立ち上がることが確認できた。
ただし、ログのメッセージは引き続き出力されており、事象とはあまり関係なかったのかもしれない。
CobblerでCentOS7のextrasリポジトリのミラーリングに失敗していたので原因調査してみた
CobblerでCentOS7の各種リポジトリをローカルにミラーリングしているが、extrasリポジトリのミラーリングに失敗していたので、原因調査してみた。
先に結論を述べると、エラーとなっていたパッケージをローカルから削除して再度ミラーリングしたところ事象解決した。
環境
- OS: CentOS 7.4
- Cobbler: 2.8.2
調査
下記がCobblerでCentOS7のextraリポジトリをミラーリングした際に出力されたメッセージ全文である。
# cobbler reposync --only=c7-extras
task started: 2018-02-10_081700_reposync
task started (id=Reposync, time=Sat Feb 10 08:17:00 2018)
hello, reposync
run, reposync, run!
creating: /var/www/cobbler/repo_mirror/c7-extras/config.repo
creating: /var/www/cobbler/repo_mirror/c7-extras/.origin/c7-extras.repo
running: /usr/bin/reposync -l -n -d --config=/var/www/cobbler/repo_mirror/c7-extras/.origin/c7-extras.repo --repoid=c7-extras --download_path=/var/www/cobbler/repo_mirror -a x86_64
received on stdout: Repository epel is listed more than once in the configuration
Repository epel-debuginfo is listed more than once in the configuration
Repository epel-source is listed more than once in the configuration
3.1 kB     00:00
3.4 kB     00:00
7.1 kB     00:00
2.5 kB     00:00
2.4 kB     00:00
2.5 kB     00:00
2.4 kB     00:00
2.9 kB     00:00
1.3 kB     00:00
2.5 kB     00:00
python-itsdangerous-0.23-2.el7 FAILED
python-itsdangerous-0.23-2.el7.noarch: [Errno 256] No more mirrors to try.

received on stderr:
Exception occured: <class 'cobbler.cexceptions.CX'>
Exception value: 'cobbler reposync failed'
Exception Info:
  File "/usr/lib/python2.7/site-packages/cobbler/utils.py", line 106, in die
    raise CX(msg)

Exception occured: <class 'cobbler.cexceptions.CX'>
Exception value: 'cobbler reposync failed'
Exception Info:
  File "/usr/lib/python2.7/site-packages/cobbler/action_reposync.py", line 119, in run
    self.sync(repo)
   File "/usr/lib/python2.7/site-packages/cobbler/action_reposync.py", line 163, in sync
    return self.yum_sync(repo)
   File "/usr/lib/python2.7/site-packages/cobbler/action_reposync.py", line 431, in yum_sync
    utils.die(self.logger,"cobbler reposync failed")
   File "/usr/lib/python2.7/site-packages/cobbler/utils.py", line 114, in die
    raise CX(msg)

reposync failed, tries left: 0
reposync failed, retry limit reached, skipping
running: chown -R root:apache /var/www/cobbler/repo_mirror/c7-extras
received on stdout:
received on stderr:
running: chmod -R 755 /var/www/cobbler/repo_mirror/c7-extras
received on stdout:
received on stderr:
Exception occured: <class 'cobbler.cexceptions.CX'>
Exception value: 'overall reposync failed, at least one repo failed to synchronize'
Exception Info:
  File "/usr/lib/python2.7/site-packages/cobbler/utils.py", line 106, in die
    raise CX(msg)

Exception occured: <class 'cobbler.cexceptions.CX'>
Exception value: 'overall reposync failed, at least one repo failed to synchronize'
Exception Info:
  File "/usr/lib/python2.7/site-packages/cobbler/remote.py", line 82, in run
    rc = self._run(self)
   File "/usr/lib/python2.7/site-packages/cobbler/remote.py", line 243, in runner
    3), name=name, nofail=nofail, logger=self.logger)
   File "/usr/lib/python2.7/site-packages/cobbler/api.py", line 804, in reposync
    return reposync.run(name)
   File "/usr/lib/python2.7/site-packages/cobbler/action_reposync.py", line 148, in run
    utils.die(self.logger,"overall reposync failed, at least one repo failed to synchronize")
   File "/usr/lib/python2.7/site-packages/cobbler/utils.py", line 114, in die
    raise CX(msg)

!!! TASK FAILED !!!
下記のメッセージが気になった。
python-itsdangerous-0.23-2.el7 FAILED
python-itsdangerous-0.23-2.el7.noarch: [Errno 256] No more mirrors to try.
調査したところ、関連がありそうな記事として下記が見つかった。
同じパッケージ名でエラーになっている方が何名かいるようだった。 ミラーリング元の原因も考えられるが、ミラーリング先であるローカル環境の問題もあるので、両面からアプローチしてみる。
対応
ミラーリング元を変更(解決せず)
Cobblerのリポジトリ設定で、ミラーリング元を変更してみた。
まずは、現状の設定を確認する。
# cobbler repo report --name=c7-extras
Name                           : c7-extras
Apt Components (apt only)      :
Apt Dist Names (apt only)      :
Arch                           : x86_64
Breed                          : yum
Comment                        :
Createrepo Flags               : <<inherit>>
Environment Variables          : {}
Keep Updated                   : True
Mirror                         : http://ftp.iij.ad.jp/pub/linux/centos/7/extras/x86_64
Mirror locally                 : True
Owners                         : ['admin']
Priority                       : 99
External proxy URL             :
RPM List                       : []
Yum Options                    : {}
次に、ミラーリング元を変更する。IIJから同じ国内である理研に変更してみる。
# cobbler repo edit --name=c7-extras --mirror=http://ftp.riken.jp/Linux/centos/7/extras/x86_64
設定を再度確認し、Mirrorが変更後のURLとなったことを確認する。
[root@ope01 ~]# cobbler repo report --name=c7-extras
Name                           : c7-extras
Apt Components (apt only)      :
Apt Dist Names (apt only)      :
Arch                           : x86_64
Breed                          : yum
Comment                        :
Createrepo Flags               : <<inherit>>
Environment Variables          : {}
Keep Updated                   : True
Mirror                         : http://ftp.riken.jp/Linux/centos/7/extras/x86_64
Mirror locally                 : True
Owners                         : ['admin']
Priority                       : 99
External proxy URL             :
RPM List                       : []
Yum Options                    : {}
この状態で、下記コマンドで再度extrasリポジトリをミラーリングしてみたが、同じエラーメッセージが出力されてしまった。
# cobbler reposync --only=c7-extras
事象解決しなかったため、切り戻しとしてミラーリング元のリポジトリを理研からIIJに戻した。
# cobbler repo edit --name=c7-extras --mirror=http://ftp.iij.ad.jp/pub/linux/centos/7/extras/x86_64
ローカルのファイルを削除(解決した)
Cobblerのリポジトリでは内部的にreposyncコマンドでミラーリングしており、--download_pathオプションでローカルのミラーリング先ディレクトリを指定していた。
/usr/bin/reposync -l -n -d --config=/var/www/cobbler/repo_mirror/c7-extras/.origin/c7-extras.repo --repoid=c7-extras --download_path=/var/www/cobbler/repo_mirror -a x86_64
# ls -al /var/www/cobbler/repo_mirror/c7-extras
合計 204
drwxr-xr-x   7 root apache     98  2月 10 10:15 .
drwxr-xr-x. 10 root root      141  9月 19 00:16 ..
drwxr-xr-x   2 root apache     46  2月 10 10:15 .origin
drwxr-xr-x   2 root apache  16384  2月 10 10:15 Packages
drwxr-xr-x   2 root apache  28672  2月 10 10:15 cache
-rwxr-xr-x   1 root apache    120  2月 10 10:15 config.repo
drwxr-xr-x   2 root apache 118784  1月 30 19:18 drpms
drwxr-xr-x   2 root apache   4096  2月 10 10:15 repodata
ここからは、乱暴だが下記を実施して改善したことを確認した。 もしかしたら、cache, repodataディレクトリの中身の削除は不要かもしれない。
再度ミラーリングしたところ、下記の通り事象が解決したことを確認した。
# cobbler reposync --only=c7-extras
task started: 2018-02-10_101508_reposync
task started (id=Reposync, time=Sat Feb 10 10:15:08 2018)
hello, reposync
run, reposync, run!
creating: /var/www/cobbler/repo_mirror/c7-extras/config.repo
creating: /var/www/cobbler/repo_mirror/c7-extras/.origin/c7-extras.repo
running: /usr/bin/reposync -l -n -d --config=/var/www/cobbler/repo_mirror/c7-extras/.origin/c7-extras.repo --repoid=c7-extras --download_path=/var/www/cobbler/repo_mirror -a x86_64
received on stdout: Repository epel is listed more than once in the configuration
Repository epel-debuginfo is listed more than once in the configuration
Repository epel-source is listed more than once in the configuration
3.1 kB     00:00
3.4 kB     00:00
7.6 kB     00:00
3.4 kB     00:00
2.4 kB     00:00
2.5 kB     00:00
2.4 kB     00:00
2.9 kB     00:00
1.3 kB     00:00
2.5 kB     00:00
 24 kB   00:00

received on stderr:
running: createrepo  -c cache -s sha /var/www/cobbler/repo_mirror/c7-extras
received on stdout: Spawning worker 0 with 103 pkgs
Spawning worker 1 with 103 pkgs
Workers Finished
Saving Primary metadata
Saving file lists metadata
Saving other metadata
Generating sqlite DBs
Sqlite DBs complete

received on stderr:
running: chown -R root:apache /var/www/cobbler/repo_mirror/c7-extras
received on stdout:
received on stderr:
running: chmod -R 755 /var/www/cobbler/repo_mirror/c7-extras
received on stdout:
received on stderr:
*** TASK COMPLETE ***