PrometheusとPushgatewayでGoogle Finance APIの株価をPushしてモニタリングしてみた
コンテナ環境などスケールするインフラ、システムのモニタリングに向いていると話題のPrometheusですが、Zabbix SenderみたいなPush型方式のモニタリングができるのか興味があったので調べてみました。
結論から述べると、下記の要領でPush型のモニタリングができるようです。
- Pushgatewayを起動する
- Pushgateway宛にメトリクスをPushする
- PushgatewayがPushされたメトリクスをエクスポートする
- PrometheusからPushgateway上のメトリクスをスクレイプする
Prometheusを扱うことも初めてでしたが、やってみたことをまとめてみます。
環境
1台のサーバにすべてのミドルウェアをインストールしていきます。
- OS: CentOS 7.4
- Prometheus: 2.2.1
- node_exporter: 0.15.2
- Pushgateway: 0.4.0
- Grafana: 5.0.4
なお、下記のポートで各サービスが提供されるようになります。
| port | service |
|---|---|
| tcp/3000 | Grafana |
| tcp/9090 | Prometheus Server |
| tcp/9091 | Prometheus Pushgateway |
| tcp/9100 | Prometheus Node Exporter |
参考
構築手順に関しては、下記を参考にしました。
- Getting started | Prometheus
- prometheusでテストアラート by pushgateway - Qiita
- インフラ・サービス監視ツールの新顔「Prometheus」入門 | さくらのナレッジ
PythonでPushgatewayにデータを送るスクリプトを作成するために下記を参考にしました。
モニタリング対象データとして、Google Finance APIで株価をリアルタイムで取得するために下記を参考にしました。
- Google financeでティックデータを取得するときのメモ – Momentum
- google financeのAPIのメモ - メモ
- Real-Time Google Finance API を使って株価を取得する
構築手順
Python 3.6のインストール
PythonでPushgatewayにメトリクスを送るスクリプトを記述するため、下記手順でPythonをインストールしておきます。
# yum install epel-release
# yum install python36
# python36 --version
Python 3.6.3
Prometheus各種サービス起動用のユーザ作成
Prometheus関連サービスの起動用のユーザを作成しておきます。
# useradd -U -s /sbin/nologin -M -d / prometheus
Node Exporterのインストール
Node Exporterのバイナリをダウンロードし、/usr/localに配置します。
# cd /tmp
# wget https://github.com/prometheus/node_exporter/releases/download/v0.15.2/node_exporter-0.15.2.linux-amd64.tar.gz
# tar zxvf node_exporter-0.15.2.linux-amd64.tar.gz
# mv node_exporter-0.15.2.linux-amd64 /usr/local
# ln -s -f /usr/local/node_exporter-0.15.2.linux-amd64 /usr/local/node_exporter
Node ExporterのSystemd用のUnitファイルを作成します。
# vi /etc/systemd/system/node_exporter.service
---
[Unit]
Description=node_exporter for Prometheus

[Service]
Restart=always
User=prometheus
ExecStart=/usr/local/node_exporter/node_exporter
ExecReload=/bin/kill -HUP $MAINPID
TimeoutStopSec=20s
SendSIGKILL=no

[Install]
WantedBy=multi-user.target
---
Node Exporterの自動起動設定を有効化し、起動します。
# systemctl daemon-reload
# systemctl enable node_exporter
# systemctl start node_exporter
Node Exporterのサービス用のURLにアクセスいて、取得しているメトリクス一覧を確認しましょう。
Pushgatewayのインストール
Pushgatewayのバイナリをダウンロードし、/usr/localに配置します。
# cd /tmp
# wget https://github.com/prometheus/pushgateway/releases/download/v0.4.0/pushgateway-0.4.0.linux-amd64.tar.gz
# tar zxvf pushgateway-0.4.0.linux-amd64.tar.gz
# mv pushgateway-0.4.0.linux-amd64 /usr/local
# ln -s -f /usr/local/pushgateway-0.4.0.linux-amd64 /usr/local/pushgateway
PushgatewayのSystemd用のUnitファイルを作成します。
# vi /etc/systemd/system/pushgateway.service
---
[Unit]
Description=pushgateway for Prometheus

[Service]
Restart=always
User=prometheus
ExecStart=/usr/local/pushgateway/pushgateway
ExecReload=/bin/kill -HUP $MAINPID
TimeoutStopSec=20s
SendSIGKILL=no

[Install]
WantedBy=multi-user.target
---
Pushgatewayの自動起動設定を有効化し、起動します。
# systemctl daemon-reload
# systemctl enable pushgateway
# systemctl start pushgateway
Pushgatewayのサービス用のURLにアクセスし、Pushgateway上のメトリクスを確認してみましょう。後々Pushしたメトリクスが表示されるようになります。
Prometheusのインストール
まず、設定ファイルとモニタリングデータを配置するためのディレクトリを作成しておきます。
# mkdir /etc/prometheus /var/lib/prometheus
# chown prometheus:prometheus /var/lib/prometheus
Prometheusのバイナリをダウンロードし、/usr/localに配置します。
# cd /tmp
# wget https://github.com/prometheus/prometheus/releases/download/v2.2.1/prometheus-2.2.1.linux-amd64.tar.gz
# tar zxvf prometheus-2.2.1.linux-amd64.tar.gz
# mv prometheus-2.2.1.linux-amd64 /usr/local
# ln -s -f /usr/local/prometheus-2.2.1.linux-amd64 /usr/local/prometheus
設定ファイルを作成します。
# cp -piv /usr/local/prometheus/prometheus.yml /etc/prometheus/
# vi /etc/prometheus/prometheus.yml
---
global:
  scrape_interval:     15s # By default, scrape targets every 15 seconds.

  # Attach these labels to any time series or alerts when communicating with
  # external systems (federation, remote storage, Alertmanager).
  external_labels:
    monitor: 'codelab-monitor'

# A scrape configuration containing exactly one endpoint to scrape:
# Here it's Prometheus itself.
scrape_configs:
  # The job name is added as a label `job=<job_name>` to any timeseries scraped from this config.
  - job_name: 'prometheus'

    # Override the global default and scrape targets from this job every 5 seconds.
    scrape_interval: 5s

    static_configs:
      - targets: ['localhost:9090']

  # for Node Exporter in Prometheus Server
  - job_name: 'node'
    static_configs:
      - targets: ['localhost:9100']

  # for Pushgateway
  - job_name: 'pushgateway'
    static_configs:
      - targets: ['localhost:9091']
---
PrometheusのSystemd用のUnitファイルを作成します。
# vi /etc/systemd/system/prometheus.service
---
[Unit]
Description=Prometheus - Monitoring system and time series database

[Service]
Restart=always
User=prometheus
ExecStart=/usr/local/prometheus/prometheus --config.file=/etc/prometheus/prometheus.yml --storage.tsdb.path=/var/lib/prometheus/data
ExecReload=/bin/kill -HUP $MAINPID
TimeoutStopSec=20s
SendSIGKILL=no

[Install]
WantedBy=multi-user.target
---
Prometheusの自動起動設定を有効化し、起動します。
# systemctl daemon-reload
# systemctl enable prometheus
# systemctl start prometheus
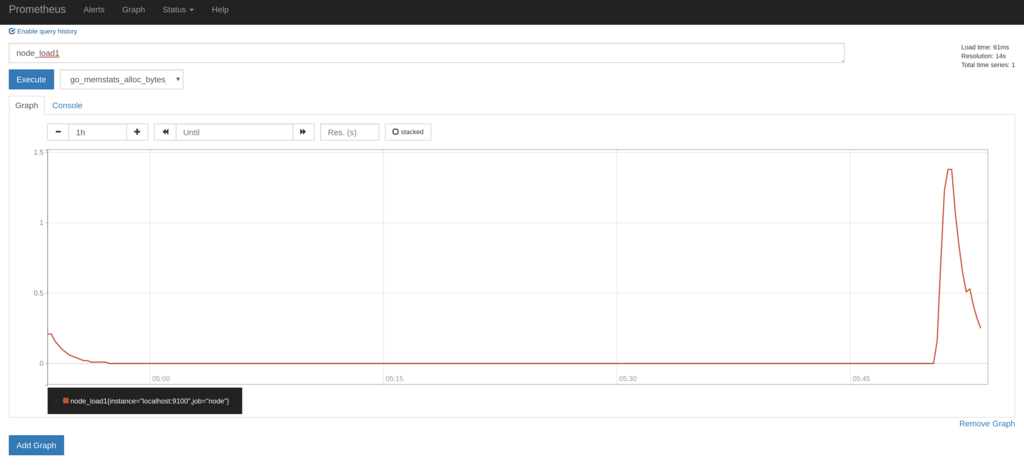
PCなどからPrometheusのGraph描画用のページにアクセスし、取得しているメトリクスのグラフが描画できることを確認します。
- http://{{ PrometheusをインストールしたサーバのIP }}:9090/graph

Grafanaのインストール
下記を参考にインストールします。
http://docs.grafana.org/installation/rpm/
# sudo yum install https://s3-us-west-2.amazonaws.com/grafana-releases/release/grafana-5.0.4-1.x86_64.rpm
# systemctl daemon-reload
# systemctl start grafana-server
# systemctl status grafana-server
その後、WEB画面から以下の設定を設定します。
- Prometheusをデータソースとして追加する
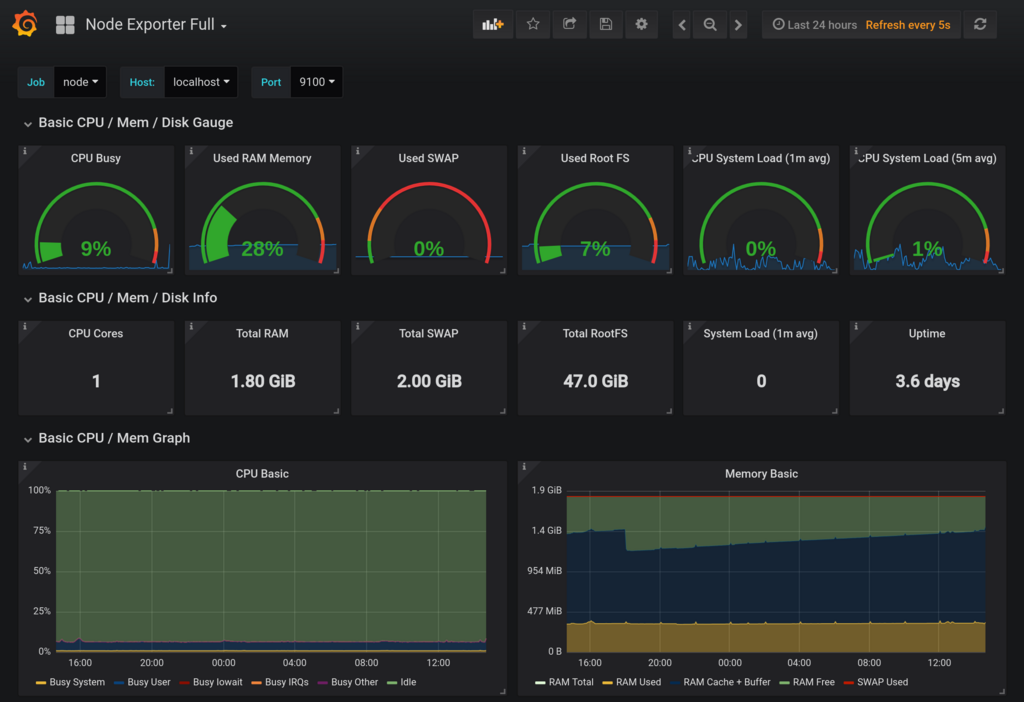
- PrometheusのNode Exporter用のダッシュボードをインストールする
上記のダッシュボードをインストールするだけで、OS関係のメトリクスの関しては十分なほど視覚化されます。

Pushgateway経由でのモニタリング
Google Finance APIから株価データを取得してPushgatewayにPushしてみる
Google Finance APIを利用して、1分毎のリアルタイムな株価データを取得し、Pushgateway経由でPrometheusに連携してみたいと思います。 APIが非公式であり、使い方に癖があるため実装が間違っている箇所があるかもしませんので正確性についてはご了承下さい。
下記のようなスクリプトをstock.pyというファイル名で作成します。
from prometheus_client import CollectorRegistry, Gauge, push_to_gateway, generate_latest
import requests
import json
import re
import argparse
import traceback
import time

# Google Finance API用
API_URL = 'https://www.google.com/finance/getprices?q={code}&x={market}&i=61&p=1Df=d,c,v,o,h,l'
regex = re.compile('a(?P<date>\d+),(?P<close>[^,]+),(?P<high>[^,]+),(?P<low>[^,]+),(?P<open>[^,]+),(?P<volume>\d+)')
def google_finance_api_parser(response):
    lines = response.splitlines()
    m = regex.finditer(lines[-1])
    return next(m)

# Main
def main():
    argparser = argparse.ArgumentParser()
    argparser.add_argument('-g', '--gateway', type=str, required=True)
    argparser.add_argument('-m', '--market', type=str, required=True)
    argparser.add_argument('-c', '--code', type=str, required=True)
    argparser.add_argument('--debug', action='store_true', help='debug printing without pushing to gateway')

    args = argparser.parse_args()
    request_url = API_URL.format(market=args.market, code=args.code)
    r = requests.get(request_url)
    if r.status_code == 200:
        registry = CollectorRegistry()
        try:
            d = google_finance_api_parser(r.text)
            Gauge('stock_price_close', 'Stock price', ['market', 'code'], registry=registry).labels(market=args.market, code=args.code).set(d['close'])
            Gauge('stock_price_high', 'Stock price', ['market', 'code'], registry=registry).labels(market=args.market, code=args.code).set(d['high'])
            Gauge('stock_price_low', 'Stock price', ['market', 'code'], registry=registry).labels(market=args.market, code=args.code).set(d['low'])
            Gauge('stock_price_open', 'Stock price', ['market', 'code'], registry=registry).labels(market=args.market, code=args.code).set(d['open'])
            Gauge('stock_price_volume', 'Stock price', ['market', 'code'], registry=registry).labels(market=args.market, code=args.code).set(d['volume'])
            Gauge('stock_price_unixtime', 'Stock price', ['market', 'code'], registry=registry).labels(market=args.market, code=args.code).set(d['date'])
            Gauge('stock_price_last_success_unixtime', 'Stock price', ['market', 'code'], registry=registry).labels(market=args.market, code=args.code).set(int(time.time()))

            if args.debug:
                print(request_url)
                print(generate_latest(registry=registry).decode('utf-8'))
            else:
                grouping_key = {'market': args.market, 'code': args.code}
                push_to_gateway(gateway=args.gateway, job='STOCK', registry=registry, grouping_key=grouping_key)
        except:
            print('[Error] failed to send stock data. check api response from "{}"'.format(request_url))
            traceback.print_exc()

if __name__ == '__main__':
    main()
上記のスクリプトで生成されるメトリクスは下記の通りです。市場と証券コードはラベルで区別するようにしました。
| メトリクス名 | 内容 |
|---|---|
| stock_price_close | 終値 |
| stock_price_high | 高値 |
| stock_price_low | 安値 |
| stock_price_open | 始値 |
| stock_price_volume | 出来高 |
| stock_price_unixtime | 終値の時刻(Unixtime) |
| stock_price_last_success_unixtime | 株価を取得した時刻(Unixtime) |
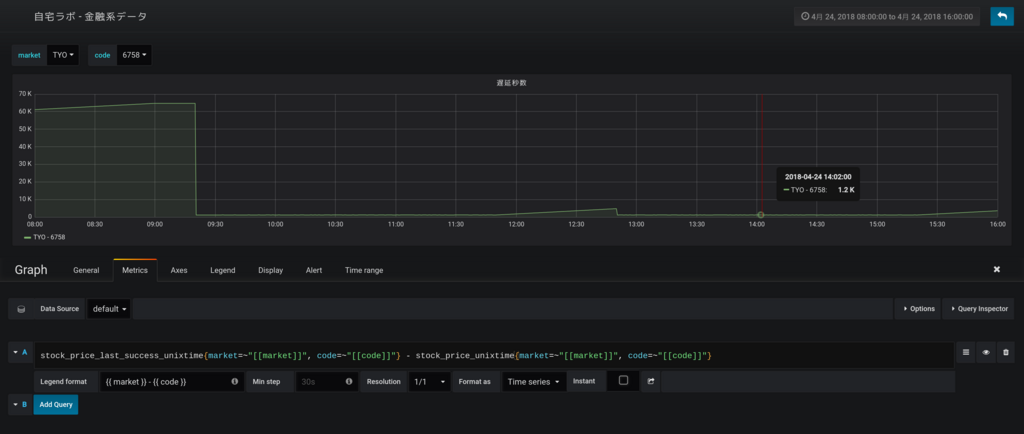
Google Finance APIでは国内の株価は20分ほど遅延しており、株価を取得した時刻(stock_price_last_success_unixtime)と取得できた終値の時刻(stock_price_unixtime)には差が生じます。このあたりも、後にグラフ化するとよくわかるようになります。
次に、下記のように実行環境を作成します。
$ mkdir ~/bin
$ cd ~/bin
$ vi stock.py
※ 上記で作成したスクリプトを保存します

$ python36 -m venv env
$ source env/bin/activate
(env) $ pip install prometheus_client requests
スクリプトにPushgatewayのURLとGoogle Finance APIから取得する株価の市場とコードを引数として与え実行します。
試しに標準出力にデータを出力してみます。
(env) $ python stock.py -g localhost:9091 -m TYO -c 6758 --debug
----
# HELP stock_price_close Stock price
# TYPE stock_price_close gauge
stock_price_close{code="6758",market="TYO"} 5426.0
# HELP stock_price_high Stock price
# TYPE stock_price_high gauge
stock_price_high{code="6758",market="TYO"} 5427.0
# HELP stock_price_low Stock price
# TYPE stock_price_low gauge
stock_price_low{code="6758",market="TYO"} 5425.0
# HELP stock_price_open Stock price
# TYPE stock_price_open gauge
stock_price_open{code="6758",market="TYO"} 5425.0
# HELP stock_price_volume Stock price
# TYPE stock_price_volume gauge
stock_price_volume{code="6758",market="TYO"} 67800.0
# HELP stock_price_unixtime Stock price
# TYPE stock_price_unixtime gauge
stock_price_unixtime{code="6758",market="TYO"} 1524548340.0
# HELP stock_price_last_success_unixtime Stock price
# TYPE stock_price_last_success_unixtime gauge
stock_price_last_success_unixtime{code="6758",market="TYO"} 1524549541.0
----

Pushgatewayにデータを送ります。
(env) $ python stock.py -g localhost:9091 -m TYO -c 6758 --debug
cronで毎分実行させるために、crontabに設定を追加します。
$ crontab -e
---
* * * * * cd ${HOME}/bin && source env/bin/activate && python stock.py -g localhost:9091 -m TYO -c 6758 > /dev/null 2>&1
* * * * * cd ${HOME}/bin && source env/bin/activate && python stock.py -g localhost:9091 -m TYO -c 9432 > /dev/null 2>&1
---
PushしたメトリクスをPushgatewayで確認する
Pushgatewayのメトリクス一覧を確認すると、下記のようにPushしたメトリクスがエクスポートされるようになります。
# HELP stock_price_close Stock price
# TYPE stock_price_close gauge
stock_price_close{code="6758",instance="",job="STOCK",market="TYO"} 5433
stock_price_close{code="9432",instance="",job="STOCK",market="TYO"} 5163
# HELP stock_price_high Stock price
# TYPE stock_price_high gauge
stock_price_high{code="6758",instance="",job="STOCK",market="TYO"} 5434
stock_price_high{code="9432",instance="",job="STOCK",market="TYO"} 5164
# HELP stock_price_last_success_unixtime Stock price
# TYPE stock_price_last_success_unixtime gauge
stock_price_last_success_unixtime{code="6758",instance="",job="STOCK",market="TYO"} 1.524550204e+09
stock_price_last_success_unixtime{code="9432",instance="",job="STOCK",market="TYO"} 1.524550205e+09
# HELP stock_price_low Stock price
# TYPE stock_price_low gauge
stock_price_low{code="6758",instance="",job="STOCK",market="TYO"} 5433
stock_price_low{code="9432",instance="",job="STOCK",market="TYO"} 5162
# HELP stock_price_open Stock price
# TYPE stock_price_open gauge
stock_price_open{code="6758",instance="",job="STOCK",market="TYO"} 5434
stock_price_open{code="9432",instance="",job="STOCK",market="TYO"} 5163
# HELP stock_price_unixtime Stock price
# TYPE stock_price_unixtime gauge
stock_price_unixtime{code="6758",instance="",job="STOCK",market="TYO"} 1.524549e+09
stock_price_unixtime{code="9432",instance="",job="STOCK",market="TYO"} 1.524549e+09
# HELP stock_price_volume Stock price
# TYPE stock_price_volume gauge
stock_price_volume{code="6758",instance="",job="STOCK",market="TYO"} 21800
stock_price_volume{code="9432",instance="",job="STOCK",market="TYO"} 3900
今回のように、同一メトリクスに対してラベルを切り替えて複数回に分けてデータをPushする場合は、grouping_keyを適切に設定しないとすでにPush済みのデータが削除されてしまうこともあるので注意が必要です。
私の場合は、当初grouping_keyを全く設定していなかったため、cronで設定したうちの一つの株価しかPushgatewayに残りませんでした。
詳細は下記を参照して下さい。
PushしたメトリクスをGrafanaで確認する
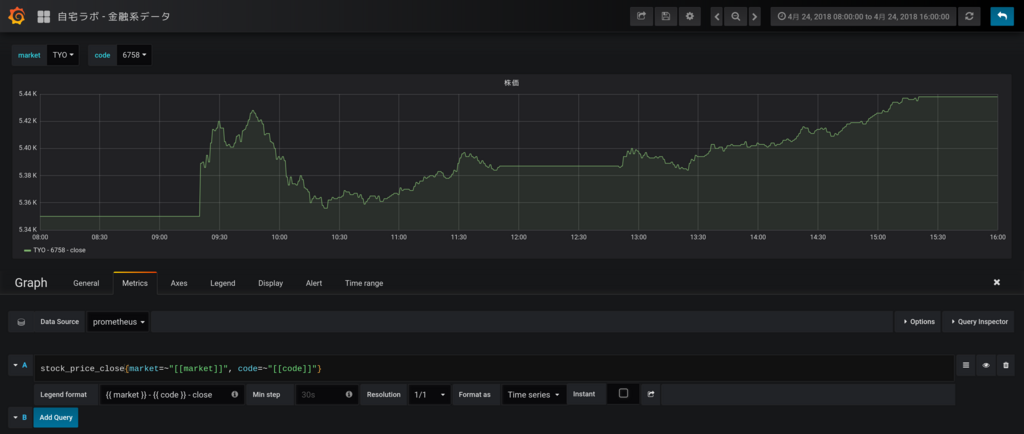
下記のように株価のグラフを作成します。ローソクではなく1分毎の終値でプロットさせていますが、なんとなく株価のように見えますね。

次に、APIの更新遅延のグラフを作成します。取引時間中はだいたい1200秒(20分)程度遅延しているようですね。お昼休みと取引時間外はAPIの最新データの時刻が更新されないため遅延が拡大していっています。

まとめ
PrometheusとPushgatewayでPush型のモニタリングができるかをGoogle Finance APIのデータを使って試してみました。
Google Finance APIの調査に時間をかけてしまいましたが、Prometheus自体は簡単に構築できてNode Exporterだけでも十分すぎるほどメトリクスが取得でき、またGrafanaでも簡単に視覚化できるので非常に便利だなと思いました。
Zabbix Senderと比較して思ったのが、PrometheusではPushgatewayをスクレイプした時刻でメトリクスを記録するため、過去の事項に遡ってデータを登録するといったことは難しそうということです。ちなみに、Zabbix Senderではタイムスタンプ付きでデータを送れるためバルクインサート的なことが可能になっています。
PrometheusでもバルクインサートAPIを求めるissueが上がっているようです。
Add API for bulk imports · Issue #535 · prometheus/prometheus · GitHub
今度は、アラート通知などもやってみたいと思います。